Everyone loves no-screw light fixtures around the house—until it is time to remove them. It can be a little complicated, but we’ve got your back. Here’s how to remove a ceiling light fixture with no screws:

No-Screw Light Fixtures
There’s no doubt that light fixtures with no screws look very fancy. They give the house a charming look and enhance its beauty.
The problem begins when the bulb blows. You can find the little manual that explains how to change the bulb—or you do find it and don’t understand a word of it. You try to tinker around the light on your own but it remains an unsolvable mystery.
You find yourself wishing you had just gone for the simple screw-in lights instead of these fancy no-screw ones.
Not this time! Read on for a detailed guide on removing light fixtures with no screws. The next time a bulb blows in your house, you’ll be ready.
How to Remove Ceiling Light Fixture with No Screws

The method of removing the light fixture depends on the mechanism it operates on. There are 4 kinds of no-screw fixtures. We’ll take you through removing each of them:
Groove or Notch Mechanism
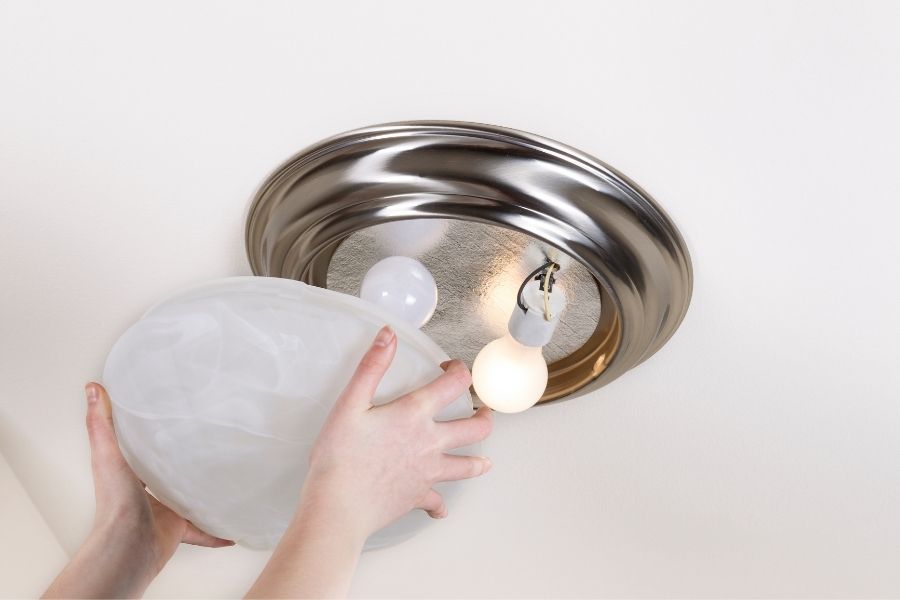
This kind of light fixture is easy to identify—the dome of the light is attached to its base using a groove or notch mechanism. You’ll need an extra set of hands to remove this fixture, so find someone to partner up with you.
It’s fairly easy to remove this fixture. Ask your partner to push the fixture gently towards the ceiling while you twist it around. Keep twisting till it comes off the base.
Once it is free of the base, it will come apart very easily. If you don’t get it on the first go, try twisting the other way because the notch in the fixture dome might be facing away from the base groove. It will be easy once you discover the groove.
Reattaching the fixture is even simpler. Get your partner to help you again. One of you needs to push the fixture’s base towards the ceiling while the other twists the fixture’s dome into the groove.
Let go once it is done and the fixture should be safely secured to the wall again. Easy peasy, right?
Spring-Loaded
There are tight springs that press the dome and the base of the fixture together. You’re going to need a screwdriver to detach this one from the ceiling.
Feel around with the screwdriver along the base of the fixture and the ceiling. Jimmy it up and down in the gap between the fixture and the ceiling. The gap will widen slightly and you will be able to slide your fingers into it.
Once you’re in, you should be able to just pull the fixture away from the wall.
Here’s the 411 on spring-loaded light fixtures—they are designed in such a way that you can just pull them away from the ceiling and they will stay put as you change the light bulb.
You don’t need to set it down to change the lightbulb. It’s almost hands-free! Reattaching this light fixture to the wall or ceiling works the same way.
Just push the light fixture back and it should fall into place with a satisfying click. If you are worried you won’t be able to put it back together, there is a very simple hack.
Just detach the dome from only one side. There will be enough space to let you change the bulb without detaching the dome on the other side. You can easily put it back if you only pull one side free.
If this method didn’t work on your spring-loaded light fixture, try this instead—put pressure on the fixture’s base and the dome should come loose on its own.
This is because some fixtures have a pressure-operated mechanism. When you push on the base, the springs contract and leave room for the base to detach on its own. Just push in the springs and the dome should snap into the base again.
Slotted Connectors
Slotted connectors mean that there are raised bumps on the base that lock into corresponding grooves in the dome. Removing light fixtures with slotted connectors is very simple.
Just twist the fixture so that the raised bumps and grooves are misaligned. Pull it towards you and it should detach from the wall or ceiling easily.
Use the same principle to put it back. Find the raised bumps and align them with the grooves in the dome. Twist the dome around till the bumps align with the grooves. The fixture will click into place and you can let it go.
Flush Mount
Flush mounts are light fixtures that have no space between the base and the wall or ceiling. This is how you remove flush mounts:
- Find the finial. It is the small, seemingly decorative detail in the center of the dome.
- Turn it to the left and it should start loosening up. Make sure to hold onto the dome with your other hand. While you turn it around the dome will start detaching from its base.
- When you are done unscrewing the finial, the dome will be free of the base of the fixture.
Detaching the fixture might have been a piece of cake, but putting it back is a little more tricky.
You need to put the finial back into the dome the way it was. Finials are usually tiny, so it is delicate work. Move carefully and keep your hands steady.
Here comes the tricky part. When you are done screwing it into the dome, you need to twist the finial into the port at the base of the light fixture.
Keep twisting it around till the dome is secured to the base. If you find it difficult, you can grab a pair of pliers to twist the finial into place.
Final Thoughts
Changing normal light bulbs is a breeze when compared to changing bulbs in light fixtures with no screws. We hope this handy guide will help you with the light fixtures in your house the next time a bulb blows out.

